Thursday, 27 June 2013

Thank You, thank you, thank you ;-)

Hello there :)
Hope you are having a wonderful day. Today, was filled with laughter and sunshine. Hearing two children laughing and playing together really heals the soul!

I have been busy recently making cards, but not able to get to the computer to blog about them. I will try to catch up!

I recently had the pleasure of making some thank you cards, for three ladies from my local "mother & toddler" group. Not wanting to make the same cards (or able to restrict myself to three the same), I chose a few papers, die cuts, doily and other few bits and made similar, themed cards.


 I cut out some canvas with a Nellie's Multi frame die, and inked it with blue to create the flower.
 (sorry this shot is a bit blurred - I heat embossed the sentiment with red embossing powder. It has such a WOW look when embossed)
I used some foam pads to stick down the tag, to give it a bit of depth.


No. 2:

 Again, I heat embossed the sentiment, this time onto the actual tag. This flower was created with a smaller die from the Nellie's Multi frame's die set.
I used my Sizzix Circle Scallop Lace die to cut through some vellum, and then used a circular die to create a frame.

No. 3:
 I used the 'negative' of the die cut paper to create a frame.

I inked the edges of the circle and the doily with a blue ink pad and blender tool.

What I used (from what I can remember!)
Sizzix Bigz Die - Circle, Scallop Lace
Nellie's Multi Frames
Prima 6x6 Doodle Deux Collection
Kraft Card blanks
Papermania Bare Kraft Gift Tags
Buttons from stash and doilys.

I am entering the first card in the following challenges:

 Simon Says Stamp Challenge - Anything Goes
Scrappers Delights Challenge - Die Cuts or Punches
Crafts and Me Challenges - Anything Goes
Crafting for all Seasons Challenge - Make it Girly

Thanks for stopping by, hope your Wednesday is filled with fun.
Eithne

Sunday, 23 June 2013

Recipe Card

Hello, I'm back with a card I made for this weeks challenge over at Eclectic Ellapu. This week it is a recipe challenge:
1 Stamped Image/Digi Image.
2 Embellishments (ribbon, buttons, flowers, charms etc)
3 Papers
and 2 Die Cuts.

I used a Happy Birthday embossing folder to give a bit of texture to the card.

Some close ups:


 For the two embellishments I used a crown brad and some silver cord ribbon.


I used three different pink papers for the strips on the front, the hanging flower and the circle in the background.


For my two die cuts, I cut out the aperture and the hanging flower.
I also couldn't help doodling a little on the front and around the circle of deep pink paper in the background, with a silver pen. I also used some ink to highlight some of the embossed card.

Why not give the challenge a go?
Thanks for stopping by :)
Eithne


Saturday, 22 June 2013

Oh I do like to be beside the seaside :-)

Hello, and happy weekend :D I hope you are having a wonderful weekend.


We came back from our summer holidays yesterday. We spent a week in south Ireland, in a town called Youghal (pronounced "Y'all")


We had glorious weather, a wonderful beach house and great fun to keep us going for the week!

We spent a lot of time here:

doing this:

or this:

spending waaaay too much time in this Cafe garden:


eating loads of these delicious kind of things:


And of course, no family holiday is complete without a LOT of time spent in these areas!


We are slowly getting back to normality, but can't wait to return to Youghal, Co. Cork for our next holiday! I hope if you get away on holidays, you have a wonderful time also.
Thanks for stopping by,
Eithne :D

Saturday, 8 June 2013

A Great Adventure

Hello :D Hope you are enjoying your weekend. Here in Ireland the weather is absolutely fabulous! It has been dry and sunny for the past week, probably the first time in three years. Yes, you heard me right, 3 years!!!
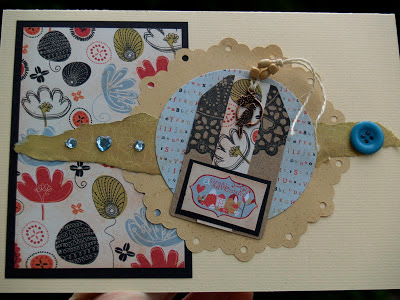
Over at Eclectic Ellapu this week the challenge is "B is for…" Your project has to contain three items that begin with B. This week, this is my DT entry:

My three B's are - Button, beads and Bird Charm.


I used three different printed paper from the Prima "Doodle Deux Collection". I love the tones in the papers. 

With my Sizzix Circle, Scalloped Lace die, I cut out the design onto some cream/yellow art paper. I stamped a kraft tag with a Papermania Urban Stamp, and then layered it up with more paper from the "Doodle Deux Collection". The 'sentiment' was also from the paper collection.  

 I threaded some beads through the twine in the tag. Used some gems and a button that tied in with the colour theme.

I love this collection of paper, and how versatile it is with a lot of my supplies already! Hope you like this card. Why not give the challenge a go?

I am entering this card in the following challenges also:
Charisma Cardz Challenges - Tons of Layers (12/6)
Left of Center Creative Challenges - Two Designer papers
Crafty Catz - Lace and Buttons
Crafty Friends Challenge - Bingo card


Thanks for stopping by. Have a great Sunday :D
Eithne

Sunday, 2 June 2013

Room for Improvement Challenge: Card Room Makeover

A few weeks back, my sister Emily told me about a challenge from Money Supermarket. This is how the challenge went: you emailed to register your interest, once accepted they sent £50 and then the fun began! You make over a room in your house, and then blog about it, telling how you spent the money.

I decided to do my Card Room. This room NEEDED. A. LOT. of attention. Last year, full of energy and gusto I wallpapered one wall. I then got busy, lazy, busier, lazier and then very soon my room looked like this:

Yes, I am ASHAMED to say how I ignored the mountains (or Mount Eithne's as they are "fondly" called in my house) that started to gather behind me as I crafted.... "My" room became the dumping ground, so much easier to dump than sort, and so it got worse, week after week. Time has been precious the past year, and when I did get a moment to myself, I didn't see the point in tidying up. I crafted instead :D

So when I came upon this challenge I decided to go for it! How I longed to have a bit more organisation to my messy desk:


And one last photo, just for the pure shame of it! This was my crafting area, the other side of the very small room.

So with money in hand, I knew there were a "few" problem areas!
(1)  Firstly, the room being so small an 8ft by 8ft "L" shaped room, I needed MORE space! But alas, I was unable to increase the size of the room, so I just had to make do with better storage ideas.
(2)  When working at the computer, I had no space at all. I NEEDED a desk!
(3)  I donated my swivel chair to my husband, (he is studying and spending longer at a desk) so I was using a dining chair. After any length of time, I was hunched over the desk. I needed to get a good supportive chair.
(4)  Much and all as I loved the wallpaper, it was so blah with the cream/magnolia walls. I longed for something more inspiring!

I decided to go for a lime green colour to complement the green in the wallpaper. I had an old paint swatch when deciding at home, so when I went to my local hardware shop, I had to choose a colour again. Let me tell you, choosing a paint with two energetic toddlers exploring a packed hardware shop, is no joke! Having saved a pile of cornice mouldings from falling on my youngest, I then had to carry her to save any more calamities! After much stress, toddler on hip, colour chart in hand, I choose this colour to be mixed: Dulux Lime Zest 3. As my wall space was so small, I chose 1 litre of paint. (a big no no for future painting jobs) Little did I know, that the wall had a lumpy wallpaper on it from maybe 30-40 years ago, and that I would need ALOT of paint to cover the wall. It was like painting pebble dash.
I started painting, and the colour came out like neon yellow. I didn't have enough paint to do two or three coats, and at €20 per litre I couldn't afford to get more, so drastic action had to be taken. Thankfully when starting the renovation, I found a darker green paint in the shed, it didn't suit at all. I poured some of this paint into the Lime Zest, and voila the colour was beautiful! Bright and airy, exactly as I wanted it.
After a fortnight of 4-5 hours sleep a night, I managed to paint the room, sort out all my crafting belongings and other miscellaneous items, buy a desk and chair, assemble them and do a little bit of crafting to pretty the room up. It was a loooonnngg slog, and throughout I thought how crazy I was to undertake it, but now as I type in my renovated room, I can not say how thrilled I am at the outcome. I feel so compelled to sit down and work on the computer or craft, I can honestly say I would never have embarked on the undertaking, had I not decided to go with the challenge.
Here is my revamped computer desk/work area:
A closer view:


My desk:
Now for the other side of the room, the side I spend most time at, creating!


Even mentally, I find a better flow to the room. I feel so inspired to craft or be creative in any form!

I had some plastic containers that were very boring, so with some left over wallpaper, I covered them. I think they look so much prettier!


So, for the before and after shots, side by side:


I absolutely LOVE IT! This room has become a haven for me to retreat to at night. Having spent every waking moment either thinking about it or sorting the room over the past fortnight, I can not wait to craft again!! It is done, I am so relieved I got to finish it on time, and to the way I like it.

Here is a breakdown of the cost:
Paint (1 litre of Dulux Vinyl Soft Sheen paint) €20
Desk €19
Chair €12
Frames €6
Baskets and bin €5.60

Total Cost: €62.60 (approx. £55)

For such a huge change and impact, I think it is a small price to pay. I should have done this years ago!! I look forward to keeping it tidy ;-)

Hope you enjoyed looking at my room improvement. Thanks for stopping by :D

Eithne :-)

Disclosure: Thanks to Money Supermarket for providing the £50/€60 for this makeover challenge.