Friday 9 November 2012

Christening Card

Hello, and thanks for stopping by. Goodness, has it been that long since I was blogging? Ooops! I've been so busy doing stuff that I haven't had time to talk about it! A good complaint for sure :D

Here's an A5 card I made a while ago for my nephew's Christening.
 I die cut the centre piece, then inked the edges. I created the "Christening" paper from some wrapping paper, as I had nothing with any Christening connection on it.
 

To add a bit of interest, I used a printed vellum at the back of the banner with Darragh's name on it.
I added a button and some ribbon to three hearts, and used a "Congrats" sticker.

Hope you have a great day,
Eithne

Thursday 11 October 2012

3rd Birthday!

Last week my eldest daughter celebrated her 3rd (eek) birthday! Can't believe how time is flying by! I made this card for her big day -
I am very happy with how the card turned out, especially considering I started the card three times! I had awful trouble trying to think of a card to make. All printed paper I had was too old for her, so eventually I found some polka dotted paper I could work with.


I cut out an oval scalloped edge from a silver pinstripe board. I then used my Big shot to cut out the digit 3 from foam. I also used the Big Shot to cut out all the letters for Sarah. I put the jewels on the letters, and stuck the flower embellishment onto the centre of the flower.


For variety, I used an unusual fold for the card. It is kind of hard to work out from the first photo, so the photo above might give a better angle.
For the middle panel, I embossed some pink card and stuck it down. My embossing folder was not long enough to emboss the full height of the card (210mm) So I embossed both ends of the pink card and matched them up, or as close as I could get. I then stuck my silver scalloped oval on top.


We had a great birthday party, and really enjoyed making the card when I eventually decided what I was doing!!

I am entering this card in the following challenges -
LEJ designs - Happy Birthday
Sassy Cheryls Challenge 136 - Happy Birthday

Wednesday 10 October 2012

Best Wishes

A few weeks ago I made a card for my sister, who was expecting a baby. I couldn't blog about the card until now, as she lives in Germany and I didn't want to ruin the surprise! Well, thankfully I can report that she gave birth to a healthy baby boy :D We are all delighted for baby John's parents and can't wait to give him a BIG squeeze!!
This is the card when it is "closed". 

I embossed a scalloped circle, and stuck a circle with the stamped sentiment on to it.

 I used some washi tape on both the card and tag. I punched a hole through the flower and used a brad and some silver elastic to keep the card closed.

This is when you open the card -


I used my cricut to cut out the lady, and I used the shadow option also for the brown background layer. I cut out the dress onto some matching pink paper. I cut out some letters for 'Liv' and stuck everything down.
A close up of the little embellishment on her bag.


The card then opens as per a normal card, where I wrote a message.

I hope to enter this card into the challenges below:
Link up for Pink - 2nd annual link up for pink
Ladybugs Crafts Ink Challenge - flowers and embossing
Through the craft room door challenge - ANYTHING GOES CHALLENGE #39
Crafty Sentiments challenge - Anything goes
365 Cards - Double the fun

Hope you have a great day, thanks for stopping by.
Eithne

Tuesday 2 October 2012

Love

This is a card I made using a collage affect for the background.


I cut out two dies at different sizes and used the larger size as a mask for the ink onto some torn vellum. I then used the same ink to ink up the edges of the die cut out and stamped the sentiment on.
I used watercolour crayons and used a paintbrush to paint the heart.

I got three buttons, to tie in with the colour scheme.


I used four brads, once for each corner to hold the vellum in place.

Hope you have a great day, thanks for stopping by :D

I'm hoping to enter my card in the following challenges:
Flourishes - Think Pink
The Stamping Boutique - Pink Pink Pink
Through the Craftroom Door - Challenge 38
Link up for pink challenge
Eithne

Wednesday 19 September 2012

All You Need is Love

My good friend got married in August, and I made this card for the happy couple.
For something different, I decided to do a four panel card. The first panel I die cut out a scalloped square, and embossed a section of the front.

The second panel, I covered the background, and added a little sentiment. I got a stamp awhile back with "All You Need is Love!" As I am a HUGE Beatles fan, (and while in school I made everyone else listen to them as well, so all my friends had no option but to like them also!)


This is the embellishment I made with a few die cuts, flowers and a button. I also stamped another sentiment on, "love love love". On to some vellum I stamped silver flowers and put them onto a grey scalloped strip for behind the embellishment.
This second element I made again, from die cuts, printed vellum paper, and leaves. Again, I stamped the words "love love love". (carrying on from the song!) I covered this panel with a similar coloured paper to the first panel. Rather than a scalloped square, I cut out a plain square.


 This is at the back of the card, but when the card is closed you see it. I added some gems to break the plain look!

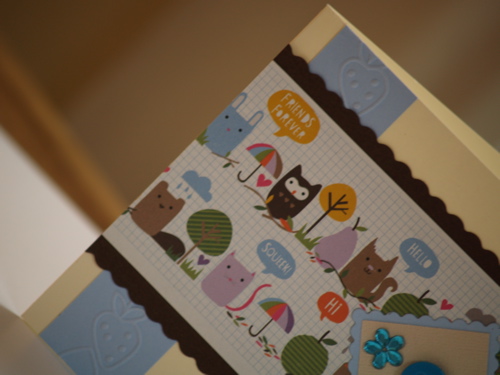
This is the view looking down on the card when it is standing up.


The "love love love" here is printed in silver ink onto plain vellum. When the card is closed it can be seen through the different size cut outs. I used two brads to hold the vellum in place, and knotted ribbon through also.

 
This is the last side of the card. I used printed vellum, iridescent card, flowers, gems, beads etc.

I am hoping to enter this card in the following challenges
Stamp n Doodle - anything goes
Simon Says Stamp Challenge - Emboss it
365 Cards - Patterned paper and a stamp on the inside


Thanks for looking, hope you have a great day.
Eithne

Sunday 26 August 2012

Blog Candy!

Hello! No card today :(   I've been busy for the past few weeks with non creative things :( :( But next week is going to be full to the brim with creating!!

For an early birthday present from my darling husband, I am going to a mixed media workshop on Saturday. It is so out of my comfort zone, I'm actually really excited about it!!! Counting down the days until it starts!

While reading through some blogs I follow, I noticed this AMAZING blog candy over at The Craft Barn!! Why not pop on over and enter.

Hope you have a great day.

Eithne

Monday 13 August 2012

Bachelorette Party Card

This weekend I am attending a bachelorette party.


Well actually over here we call it a hen party, but this was the closest for the theme I could find paper for!
I bought this paper quite a few years ago, and the cover got lost in the many years of storage!

I used Spellbinder dies and a flower embossing folder to cut out and emboss the black card. I used a silver grey card for the smaller size and heat embossed the message on.

I used some paper flowers and skeleton leaves from my stash, and used a button and brads as the centres.

I had hoped to enter this in a challenge, only that after a week of technical difficulty and baby difficulty, I missed the deadline! I'm thrilled how it turned out, and hope my friend likes it.

Thanks for stopping by, hope you have a great day :D
Eithne

Sunday 29 July 2012

Best wishes card

My brother opened up a music shop last week! A big venture, but something I know he'll succeed in, considering his enthusiasm for music, especially guitars. I needed to make two cards for this momentous occasion. Check out the photos for the first card -

I used a silver pen to highlight the wording sentiments - one dashed and the other a solid outline.
A cute little musical charm I picked up a few years ago - an electric guitar. I never had the right card for it until now!

 I stamped some silver guitars onto some greaseproof paper/vellum paper. I had some musical paper lying around so I tore that, and layered it with the greaseproof paper and some black card.


 I used some lovely white organza ribbon to make a bow and the used a brad to fasten the charm into place.

Thanks for stopping by :D

Saturday 28 July 2012

Card with freebie papers!

I LOVE to buy crafting magazines! I especially *love* when there are free gifts!! This card was made with one of the free gifts from a magazine a while back.

I used a Kraft card blank, and tore (*gasp*) the printed freebie paper at the side and stuck it to a similar coloured solid piece of cardboard. I used another printed freebie paper for the right side, and then cut a frame with my cricut. Using a gold pen I "stitched" the edge of the frame. I punched holes each side of the frame and threaded a ribbon through. I have only recently started using buttons on cards, and I love them! I used a button also for the centre of the flower.
For the sentiment I used some stickers on a piece of card. The colour of the card was too bright, so I used some brown watercolour paint to grubby it up!
My camera work still needs perfecting, it didn't focus correctly on the sentiment!
I used foam pads to lift the greeting off the card a bit!

Thanks for all the lovely comments for my first card challenge! I'm slowly making my way back to everyone's blog to return the greetings! :D

 Thanks for stopping by, hope you have great day.

Monday 23 July 2012

My first card challenge!

I have been crafting for years, but only within the past year became aware of the online crafting blogs! Although I have my own blog for a little while now, only last week I found out about challenges! Yes, don't know where my head and eyes have been!!

Anyway, for the first time ever, I am entering this card in a few challenges! 

 I used my Big Shot to cut out the different die shapes and used a Born to Shop stamp for the image. I used watercolour paints to colour in the image, and also the circular dies. I didn't have any card to hand with the "correct" tones, to match in with the beautiful printed paper. (Joanna Sheen's marbled paper pad) So I used my watercolour paints again, to create a marble affect on the larger circle.

I used some flower embellishments and I put some vellum paper at the left side, I didn't want to cover up the backing paper. I tore some craft paper to create the horizontal strip.

I cut out a rectangular die for the sentiment, which this time I chose 'happy birthday' - I always get caught out with no girly cards for my friends!

These are the challenges I am entering the card into:
A sketch for the Die-ing for a challenge.
Hey Girl challenge at Simon says stamp and show challenge


Thanks for stopping by, why not give the challenges a go?! Hope you have a great day.
Eithne

Wednesday 18 July 2012

Hi there!

 While on holidays in April, I "happened" to get to a craft shop! This printed paper is actually from a large sheet of gift wrap. Couldn't pass it, I thought it was so cute!
 I embossed a blue strip, with a strawberry and heart folder.
 I stuck a button and flower embellishment on to a blue scalloped square with a cream inside square.
 Voila - the finished card.
Hope you have a great day, thanks for stopping by :D
Eithne

Monday 9 July 2012

It's a Boy card!

Here's a quick card I made today - a baby boy card. I used some Forever Friends paper and combined it with some card I had from my stash. I cut out a scalloped square and used a sticker tag for the sentiment. 


The sticker tag had no ribbon or tie so I put some silver elastic through.


Hope you have a great day. Thanks for stopping by, please leave a comment!

Eithne

Saturday 7 July 2012

DL Thank You Card


This card started off for no one! I found the "thank you" sentiment hiding in amongst my left over cut outs, and thought it looked lovely. It is from the "Storybook" cartridge. I also found a spare cut out of the scalloped circle. I split the Thank You in half, as I needed to place them at different levels. Scouring through my stash, I found some printed paper that coordinated well with all the elements. I used it for the background, and punched a circle for the centre of the scalloped edge.

I embossed the flower background on some irridescent pink paper, but as the folder was only an A6 size, I had to do two separate pieces.  The flower "motif" is hiding the join in the two separate pieces. I stuck this onto some cream board, that I gave a scalloped edge to with my trimmer/cutter.

I put a flower, into the middle of the scalloped circle, and used a button as the flower centre.

I love the different layers on the card.


I also love the different textures.


Next, I just need to find someone to thank!

Thanks for stopping by, hope you have a good day!