Friday, 26 April 2013

Those who wander...

Hello everyone!

Hope you are enjoying the Spring weather :D I am thoroughly enjoying the bright, long days. Long may they last!!

This is the card I made for my brother and his girlfriend, they emigrated to Canada during the week.


I used the "My Mind's Eye" 6x6 paper pack, "Follow your Heart". This was the only printed paper I had, that had any relevance to the theme of card needed. (Thankfully I haven't had to make many cards for people leaving, as I would be a constant emotional mess!!)

I cut a strip of teal board to the width of the A5 card front (210mm wide) and then cut a piece of tan coloured board to fit the printed piece of paper. I embossed this with my most loved embossing folder, the Honeycomb! I used a few strips of printed paper for a bit of height.


I had some chipboard honeycomb (that I would dearly love to know where I buy more from!!) that I stuck down on top of some canvas that was folded accordion style and died with an ink pad. I then used the frayed parts of the canvas as a tie for the charm.

I used a mask and ink pad to colour up the edges of the card. With an ink blending tool, I inked up a canvas flower to tone in with the card, and stuck a button on top. 

I used some beautiful polka dotted washi tape also, cutting the bottom to tie in with the "flags" on the printed paper.


I then used the ink blending tool to ink up the edges of the card also.


I am entering my card in the following challenges:
DRS Designs - Challenge 67 Pastels
Happy Campers - Challenge No. 15
My Heart Pieces - Embossing
Southern Girls Challenge - Button Up or Show some Flair
Simon Says Stamp - Anything Goes

Thanks for stopping by. I hope you are having a wonderful Spring day also!


Eithne

Saturday, 20 April 2013

Bon voyage.

Hello, hope you are having a great day. I am just about to wind down for the night, it was an eventful day!
For the afternoon, I was at a first birthday party for my nephew. The sun shone all day, and all kiddies had a blast :)
We came home from one party and straight into another! My younger brother is moving to Canada on Tuesday :( so tonight we had a "going away" party for him. These are some buns (cupcakes) I made for the occasion....


Although it took some longer than others to realise the decoration! ;)


With red roll out icing, I used a leaf cutter as a maple leaf, to represent part of the Canadian flag. I used my standard bun recipe, I will post it later in the week.


I also made some chocolate fudge brownie, and had to test several pieces as I went along. I am still waiting for the over indulgence to digest ;) ......

What is your favourite cake to bake? Mine is chocolate fudge brownie, if I do it right, it tastes deliciously moist, fudge and divine!

Thanks for stopping by, hope you are having a wonderful weekend.
Eithne

Wednesday, 17 April 2013

Missing in action!

Hello everyone! Gosh has it been so long since last posting?! It has been very, very busy this end. Not as busy with crafting as I would like, but slowly getting back into it!!

I am a crafter who usually requires a lot of thinking time before doing anything. I find it hard to just follow an example, hence why I find it practically impossible to mass produce! Each item is nearly always different from the previous. So in the evenings lately, when I get to sit down, my head is usually too frazzled to start being creative. I veg in front of the tv crocheting. I find it so relaxing letting the hook and yarn take over! I recently got a beautiful, generous gift of some fabulous coloured yarns, so I have decided to pass on the goodness with gifts to as many people possible. It will take a long time, but I will get there!!  Anyway, enough of my ramblings! Here are some photos of what I have been working on....


This is a cardigan I made for my friends little baby. I love the colour, haven't made anything blue in a while. I'm used to princess colours lately!


This is a handbag I made for a little friend of my daughters. I am in the process of making a matching hairband, after all every girl needs a bag and hairband, right? I am also planning on making one for every little girl in my life. :D

This was my first time to crochet a flower, and despite the many patterns I tried follow, I couldn't get the hang of it. So this I did by experimenting. I made the starting ring, particularly large and loose so that the cylindrical button could act as the clasp (??! Is that what it's called?!) and be pulled through to close it.


I hope where ever you are today, you are enjoying your day. Thanks for stopping by :)
Eithne

Friday, 15 February 2013

Birthday Wishes

Hello! Today in Ireland we are having a beautiful Spring day. Long may it last! Seeing the daffodil shoots and the buds on the trees, gives such hope and anticipation for Spring and Summer!

During the week my Dad celebrated his birthday. We decided to have a surprise gathering, NOT a party, for him. After much deliberation, I eventually got a card made that I was happy with. I always find making cards for men, SO difficult.


I used my honeycomb embossing folder (again) and worked with brown and cream tones. I had it in my head, I would use my Joanna Sheen marbled paper.


I also cut out a tag, and cut by hand a smaller version of the tag to create a layered effect. I stamped the sentiment onto an oval, and found some buttons and brads that were a similar tone.


At a workshop last September, I got some honeycombed cut out. I have never seen this since or used it since, but would LOVE to get more. It fits the exact size of the embossing folder, so I inked it with a goldy-brown ink and placed it on top of the embossed brown board.


Hope you a having a great day, and thanks for stopping by!
Eithne

Monday, 11 February 2013

Boy's Birthday card

Hello! Can you believe tomorrow is Pancake Tuesday? I love pancakes :D yum yum!! What will you be putting on your pancake?


A while back I made this card for my cousin's 1st birthday.


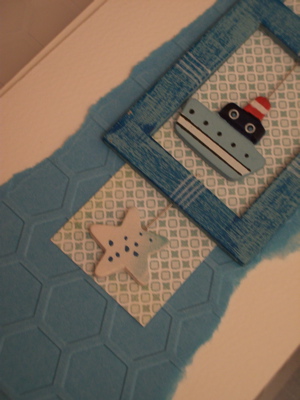
I used a DL white card. With some light blue paper, I embossed it with the honeycomb folder. I used a strip of patterned paper and a lovely wooden framed embellishment.


Outlined stickers did the trick for the sentiment.


I just downloaded the blogger app, so this my first "go" at it. I found it impossible to blog on an iPad with blogger, so this might be a great way to blog more often. (If of course I can convince my girls it's MAMMY's turn on the iPad!!)
Hope you are having a great Monday.
Thanks for stopping by :)
Eithne

Thursday, 31 January 2013

21st Album inserts

Hello :D Hope you are having a great day. Today we had a really wild, windy, wet day, I'm really looking forward to Spring!
As mentioned in the previous post, here are some more photos of the album I made at Christmas.
The Cover


The first page, a spot for a photo from birth! I used my Big Shot to cut out the numbers and also to emboss the background strip.


The second page I used as a title page for the 5 photo insert pages to follow, one pocket for each birthday over the past 20 years. I did a combination of stamping, layering and stickers to decorate.


The page that follows is for a photo from the 21st party. Again, I used a corner punch to create a pocket for putting photos in. I also embossed a strip and again used the Big Shot for cutting out the numbers for the year.


I created a pocket sheet so an invitation keepsake could be kept safe.


Some photos of the pages that follow - 


I created another pocket sheet, so that anymore keepsakes could be saved. I did a combo of dry embossing and heat embossing for decorating. On the pocket flap, I used a ribbon  punch and threaded a ribbon through.


For the last decorated page, I again used it as a title page for the couple of photo insert sheets at the end. I used layering, embossing, embellishments and outline stickers.


I then used a Bind-it-All to bind it and I stuck it into the Cover All. This was my first scrap album to create using a Cover All, and I learned a few lessons along the way, the one that sticks out the most, I'm going to share. I used very thick board for the single sheets (approx. 300gm) and a lighter board (220gm) for the pockets. This allowed for a very sturdy sheet, but a little bit more difficulty when punching on the Bind-it-All. I added thick stickers too close to the bound edge, so when punching the sheet I had to remove them. This is something I will remember in future, as I had to replace a few stickers as I tore them taking them off.

Anyway, it is late here in Ireland, and I fear my little ones may have another night of wake-ups, so I'm going to bid you adieu! Thanks for stopping by, and I hope you enjoyed the rest of the album. You can also look at a youtube video here.

Have a great day,
Eithne

Wednesday, 16 January 2013

21st Album - 8 x 8 bamboo album


Hello. Thank you for stopping by :) Today I am showing you the cover of an album I made. This is the second album I have ever made, so everything is still new to me!! It was for a friend for her 21st. I used an 8 x 8 black Bamboo Cover-it-all.


I die cut a large pink scalloped oval. Using a beautiful Japanese influenced rubber stamp, I stamped it in black. I had to keep repeating the image as the stamp was not large enough for the oval. I also had to finish off some of the design by hand, as I didn't always stamp it evenly! Oops!


To tie in with the stamped flower image, I used an outline sticker of the same image for the next layer. This was placed onto the purple card. It is a beautiful, beautiful image of the flowers, but a total pain to take out all the negative part of the stickers! It ended up being very delicate, and despite taking nearly 40 minutes of picking out the negative of the stickers, I think it is truly worth it!

I cut a strip of lime green card and embossed it with the smaller honeycomb folder from Cuttlebug. Arranging it at a diagonal, I always feel gives it a bit of character! I stuck some flower embellishments on, and used some brads for the metal flowers.

I used a Tim Holtz die, styled labels to cut out the centre white piece, and embossed it with the honeycomb embossing folder from Cuttlebug. I then punched two holes on each side, laced some ribbon through, and inked the edges. I stamped on "st" in silver, and wrote "my". I die cut the numbers 21 from glittery purple foam and stuck them on. I used foam pads for the whole label, to give it a bit of depth.


I thoroughly enjoyed making this second album. This is only the cover, but hopefully in the next few days I will get showing the rest of the album.

I hope to enter this into the following challenges

Inky Chicks - anything goes
Lady Anne's Challenges - inspired by favourite stamp
Stamp n Doodle Challenge - Anything Goes
Whimsy inspires - Fancy Edges

Thanks for looking, and please leave a comment. I would love to hear from you! Have a great day.

Eithne